Think of Baixa as a easily-navigable shopping district. The busy neighborhood follows a clean grid layout, making it feel open, orderly, and walkable.
There were a few hills, but none of the steep ones we had just toured around in the Alfama district.
And in the middle of the day, the bright sun lit up the place, casting perfect shadows on the buildings and pedestrians as we walked around.
All of this – the buildings, the sunlight, and people wandering around – made for perfect street photography conditions. It fit my style, and I took full advantage.
After taking some of these photos, I caught my breath. I was in picture heaven.
This lady, watching me take photos on the busy walkway, came up to me and started singing. Lovely!
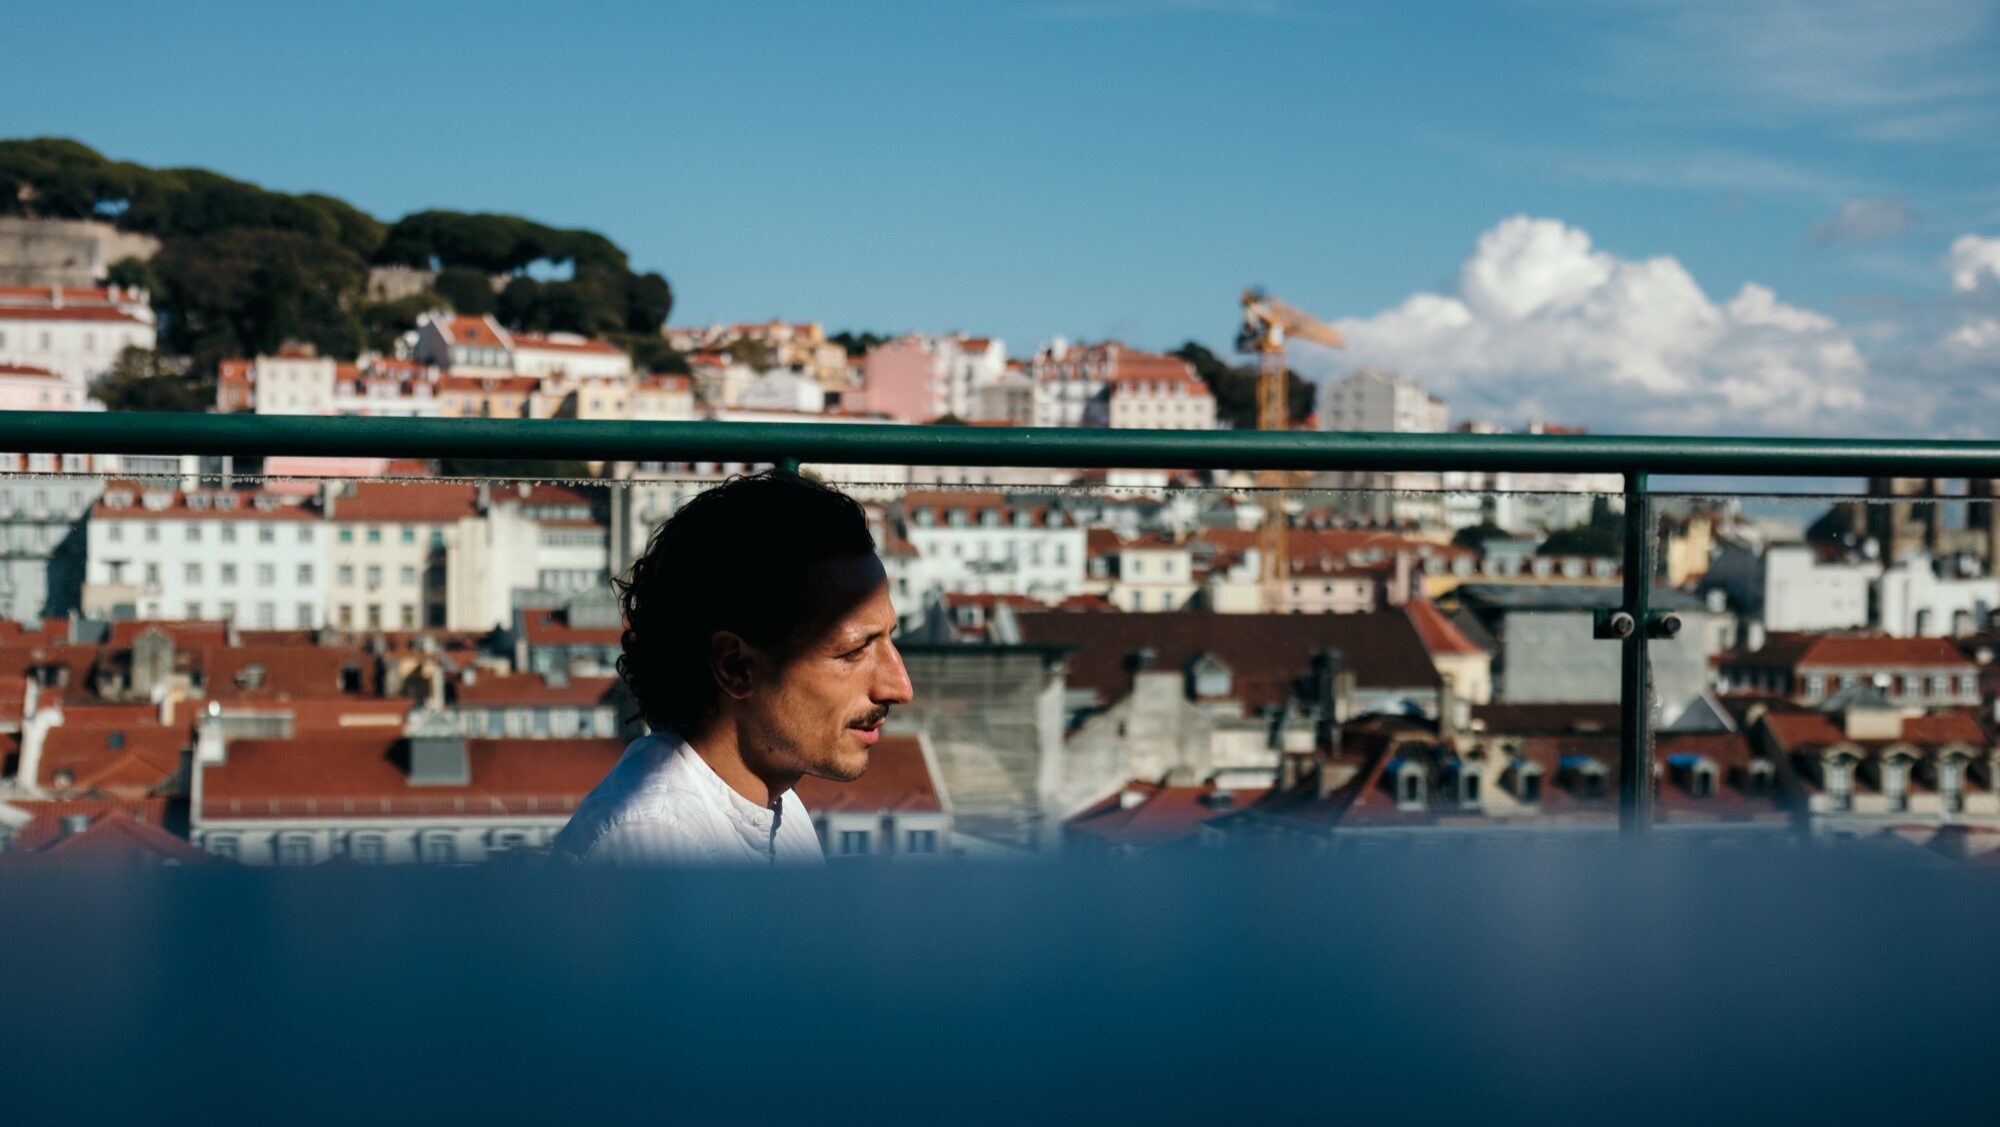
We made our way down to the Rua Augusta to the Arco da Rua Augusta, in view of the Tagus River, then back up to the Hotel do Chiado, where we grabbed lunch at their rooftop bar.
It was here that I grabbed what might be my favorite photo series from the whole trip.
Across from our table was this very animated Frenchman talking business with a local. The way the shadows and light fell across him made for a beautiful scene – so much so that I couldn’t stop making photos. Luckily, he didn’t seem to notice.
That night, we finished up our trip with a sailboat ride on the Tagus River.
Shot on the Canon EOS M6 and (mostly) the EF-M 32mm f/1.4.
Fujifilm cameras are famous for their film simulations that give images a unique character straight out of the camera.
One of the most beloved of these is Classic Chrome, known for its subtle tones, soft contrast, and cinematic feel.
But what if you shoot Canon? Good news: as I’ve talked about before with film emulations like Kodachrome and T-Max, you can get surprisingly close to that Fujifilm look with Canon’s Picture Style system.
Fuji’s Classic Chrome is all about restraint. It tones down saturation, especially in reds and blues, creating a muted, documentary-style color palette. Shadows lean slightly cool, highlights stay gentle, and the overall feel is understated – with a little touch of pink/magenta in bright spots. Think: vintage travel magazines or classic street photography.
And honestly, it’s very different from my own high-contrast, deep-saturation look. However, thanks to this Canassic Chrome (Canon + Classic = Canassic) emulation, we Canon users can achieve a similar look to that of Fuji using Picture Styles.
Here’s a quick comparison: my edit on the left, Canassic Chrome on the right:
I prefer my shadows to be black and my colors to pop (left). Classic Chrome (right) is different, a bit softer, and I took a chance on it during a recent trip to Lisbon, Portugal.
Canassic chrome in portugal
On our anniversary trip to Lisbon, Portugal, I loaded my Canon EOS M6 with Canassic Chrome to give it a spin.
What made this trip great was the variety of weather conditions. We saw sunny beach scenes, rainy and foggy hilltops, ocean cliffs, sea-side sunsets, and the contrasty urban environment of old town Lisbon.
Above, it shows its subtle tones and desaturated look on the beach at Costa De Caparica, Portugal.
I’ll have more to share on our Portugal trip, but throughout this Canassic Chrome discussion, you’ll see photos from the M6 that show what Canassic Chrome can do.
Above, I try Canassic Chrome on a rainy, foggy day in Sintra, exploring the colorful palaces and green hillsides.
Adding a touch of warmth by using Canon’s cloudy white balance was maybe a bit too much – but that’s what the experiment is for.
Here, I took Canassic Chrome for a test drive on the beaches of Costa de Caparica, close to sunset, to capture the soft, golden hour tones of the Atlantic coast.
These show the slight pink and magenta cast the Picture Style offers. It’s definitely a unique look.
WHere to get canassic chrome, and how to install it
Initially, you could grab Canassic Chrome from a site called Canon Style. Their YouTube channel remains, but the site is no longer available.
Thankfully, you can grab the Picture Style from Anh Hàng Xóm on Gumroad (I threw $1 at him, just to say “thanks”)
Once you have downloaded the PF3 file, follow these steps to install it on your Canon camera.
Set your camera to shoot either JPG only or JPG + RAW, and select the Picture Style to have your camera save a Chrome JPG.
Go out and find something to photograph to test it out.
Above are some scenes from around Old Town Lisbon – bright and sunny, showing that Canassic Chrome can be a versatile film emulation that I found flexible enough to both fit my style and provide a unique look to these pictures.
How to create your “Classic Chrome-style” Picture profile file
Want to create a Chrome style all your own? Canon’s Picture Styles give you full control over how your JPEGs (and preview images in RAW) render color, contrast, and sharpness. You can tweak existing profiles or load custom ones into your camera using Canon’s Picture Style Editor or third-party styles designed to emulate Fujifilm simulations.
The look to shoot for: muted global saturation (especially red/orange), slightly cool/teal shadows, restrained highlight roll-off, modest contrast in midtones. Overall, a cinematic and documentary feel (quiet, desaturated, moody). Use this as the target when building a Canon Picture Style.
Open either the Faithful setting or the Canassic Chrome as a base style in the editor.
Adjust parameters to your liking:
Contrast: –2
Saturation: –2
Color Tone (or colour tone/hue): slight warm shift (+1)
Sharpness: a modest increase (+2)
Save/export the result as a .PF2 (or .PF3 if your camera supports it).
Use EOS Utility (Canon’s camera software) to upload the PF2 to your camera’s custom picture-style slot.
Shooting with THIS Classic chrome Profile
Using a Classic Chrome-style Picture Style lets you capture photos with mood and personality straight out of camera. It can save editing time, help maintain a consistent aesthetic across shoots, and inspire a slower, more intentional approach to composition. Think of it like shooting film.
Coming back from Portugal, using the film emulation definitely saved on editing time. I picked a few selects from the JPGs and shared them on Instagram almost instantly. Since I can wirelessly transfer the photos from my M6 to my phone, it made sharing these photos super easy.
Whether you’re documenting a quiet street corner in Lisbon or chasing soft afternoon light near your own home, bringing a Classic Chrome vibe to your Canon setup is an easy way to infuse your digital pictures with timeless character.
There’s a lot of talk in the photography world about “everyday carry” cameras, or fixed-lens compact cameras (like the Fujifilm X100 series).
You need a portable camera, the thinking goes, to carry with you everywhere you go so you don’t miss out on those moments in between.
When I first purchased the original Canon EOS M, its “everyday carry” potential hit me immediately. “Here’s the camera I can throw in my front seat and take everywhere,” I remember thinking. That philosophy played out for 12 years, and I’ve enjoyed having the Canon M system in my life.
There are issues with the OG M, however: It’s slow to focus, and the screen blackout after taking a shot is obnoxious. Over the years, I’ve learned to live with these shortcomings. But ever since the dawn of Canon’s M system, these issues have plagued the camera line – and understandably so.
We never got the M’s successor, the Canon EOS M2, here in North America. I did hear about it, though, and longed for its faster autofocus and overall improvements in snappiness.
When my M finally gave up the ghost, I decided to upgrade my everyday carry and snatch an M2 from Japan.
Again, I loved my Canon EOS M, despite its flaws. It was the perfect example of “good enough,” and I appreciated the EF-M 22mm f/2 lens, which remained on the front of the camera at all times. In effect, it served as a fixed-lens compact camera for me. The 35mm field of view helped the M serve as my X100 with the benefit of Canon’s comfortable colors and usable interface.
Since using the M2, I remembered how slow the M was, because this little camera is much better at autofocus and has a dramatically reduced screen blackout after pressing the shutter. In fact, it was startling to go back to an M and be reminded of how pokey it is.
Now, the M2 is not going to win any speed awards. The whole M system is notoriously slow. However, taking this M2 out to Phoenix, Arizona, for a work trip (above and below), the speed benefits were immediately apparent.
The features I loved about the original M were all still here in the M2: fantastic image quality, body toughness, ease of use, and – this might be a just-for-me thing – the use of the delete button on the scroll wheel to reset the touch screen focus point (something I miss dearly on the newer M cameras).
To put it more pointedly: the M2 is a comfortable, familiar piece of kit. Just a bit better.
It’s also just a tad smaller and has added wifi functionality that will help if you use Canon’s mobile app. It has the same touchscreen as the M, which can be difficult for some folks to use in bright conditions. However, after using the M for years, I’ve made peace with the lack of an electronic viewfinder or flexible screen. Even in the hot Arizona sun, I can still make this fixed touchscreen work.
Another cosmetic thing I love about the M2 is its color and style. I grabbed the blue and brown version, which fits in perfectly with my photography aesthetic. The best description of my gear is, What if Indiana Jones had a camera, strap, and bag? That’s the style I’m after. So this little M2 fits in perfectly with the rest of my kit.
The only thing that doesn’t fit, cosmetically, is the black and silver EF-M lens color scheme. Just as you shouldn’t wear a black belt with brown shoes, the black EF-M lenses clash somewhat with this blue and brown camera body. Silver doesn’t look great either.
Yes, the M2 is 12 years old. No, the video specs aren’t the best. Nor is it a speed demon.
But if you’re dedicated to the M system and EF-M lenses, and you enjoyed the original Canon EOS M, the M2 is a worthy successor.
All images, except for the camera portraits, were shot on the Canon EOS M2 and EF-M 22mm lens.
In my latest YouTube video, I test out several film-like Canon Picture Styles to see which of them can give Canon photographers that Fujifilm-like simulation experience.
Preslav Rachev left a comment asking for feedback on a Picture Style he recently developed, Cinematic Color Negative, and offered it up for a free trial.
Last weekend, I loaded up Preslav’s filmic emulation onto my Canon M6 and shot for an artist friend of mine at his Steampunk on the Bricks event here in Jackson, Michigan.
Overall? It’s good. I like the colors and contrast – it fits my style of shooting nicely.
The reds pop, and the greens are muted. That’s just what I’m looking for in my Canon film simulations. And in good lighting, skin tones are natural.
However, testing it out on our new baby niece, and in mixed lighting, the skin tones were a bit overpowering:
Everyone else’s skin tones looked okay, but poor Baby Iris. She got the neon orange treatment. It could be a combination of jaundice and a reddish skin hue.
The baby is an outlier. For the most part, Preslav’s Cinematic Color Negative Picture Style worked well over a weekend of shooting.
A few more RAW vs JPG shots for comparison (RAW is on the left):
My eye notes the subtle desaturation of the greens and blues. The top comparison makes that clear with the plants and the blue sky.
The bottom comparison is a little more subtle: contrast is up, and the house appears whiter in the JPG. Again, the sky in the back loses a bit of blue. Whites are whiter, blacks are blacker – both help increase the contrast.
Head to Gumroad, throw Preslav a buck or two, and try out Cinematic Color Negative yourself (and check out his photography too).
I purchased my Canon EOS M 12 years ago during a Canon fire sale. Very quickly, I appreciated the M’s size, portability, and image quality.
As the years went on, the M was always there. It went everywhere: to the beach, on family trips, on urbex adventures, and in my front seat as I drove around Michigan grabbing anything that caught my eye. The M is still my grab-and-go kit, my reliable everyday carry camera.
Last year, I tried to replace it – first with the M200 and then the M6. But like a comfy, broken-in pair of shoes, I kept the original M out of – what – loyalty? Insecurity?
I’m glad I did, because on my recent Detroit trip, my Canon M6’s shutter button started to malfunction. Then, in a terribly frustrating mishap, I dropped my M6 and the EF-M 22mm on a sidewalk, denting the lens and leaving scuff marks on the M6. I’ll have to replace the lens, which is expected. The drop was my fault. But the M6’s shutter button? It’s a known issue and it hit me at the most inconvenient time while we’re on vacation. Despite my attempts to fix it, the problem is still there, and repairing it will cost more than what the camera is worth.
I tried replacing the OG Canon M. Twice now. But the hits keep on hitting.
The first week I owned the M, back in 2013, I dropped it on a street. I was so mad at myself. Here was this brand-new camera, and I had already tried to wreck it.
Do you know what happened? Nothing. The M has consistently kept shooting ever since. Despite all the drops, all the bangs, all the dust and sand, it just keeps going. In 2013, I wrote:
The camera itself is a solidly-built little instrument. It feels dense, but not heavy, so that it feels like a good, quality hunk of camera.
Here we are, 12 years later, and that sentence is still true. No, the dial pad won’t let you go up in selections anymore, and yes, it flakes out now and again. But I’ll take manageable reliability over a complete lack of functionality during critical times.
I grew to love the M6, too. I love the look, the convenient dials, and the grip. But if the shutter button gives me problems, that becomes a core issue with the camera’s operation.
Luckily, I kept the M. It’s still my everyday carry, it still travels in my vehicle front seat, and it’s still there when I need it. I could replace it with a new-in-box model, and it would probably last me another 12 years. Apart from my Canon 5D mark 1, it’s my favorite camera of all time. I talk lovingly about it in ways film photographers talk about the Leica M2 or M3, or Nikon users talk about the F series.
Canon’s M series is a dead system. I still love it.
I’m not sure where to go from here. But whichever way I go, the Canon M remains by my side.
All images captured on the Canon EOS M and EF-M 22mm f/2.
Over the last few months, I’ve spent a lot of time testing Picture Styles – Canon’s version of Fujifilm’s in-camera film emulations.
I’m not typically a JPEG shooter. I prefer to grab my RAW files and edit them in Lightroom, but in a few cases, using film-like simulations was very efficient and convenient.
In this video, I show the results of those tests and try to explain the benefits of shooting with Picture Styles. It’s also a nice option for those Fuji users if they ever have to pick up a Canon camera and shoot film-like emulations, like their beloved Classic Chrome. Picture Styles don’t have the legacy of Fuji making its own film, but they get you pretty close.
I’m aiming to try out the popular film simulations for Canon cameras – like the well-known Fujifilm emulations on the X series cameras. While Canon cameras do not come with film emulations baked in, they are available via Canon’s Picture Style editor and camera profiles.
This Kodachrome-style film simulation comes from Cinescopophila: a giant pack of 150+ picture styles featuring a ton of favorites – almost too many to practically try out. But seeing Kodachrome on the list, I had to give it a spin on a recent family trip to Detroit.
Unlike the Fujifilm simulation from Thomas Fransson, these Kodak colors are more my vibe: warmer, much better skin tones, and a healthy amount of contrast.
And those reds? They POP. The greens are nice too. There’s none of that washed-out blandness from the Pro Neigh High series.
Overall, this is a reliable film simulation if you’re a JPG shooter or don’t want to worry about editing. Most of these came out correct as-is, with a little tinkering on a few images for exposure and contrast.
Do these photos mimic Kodachrome? Not really. But for my style of shooting, and even some video, these are a good film-like preset to get you started. With a bit of adjusting, you can get this slide film emulation looking just the way you want.
There are plenty of other Kodachrome versions to try, although many come at a cost. This picture style from Vision Wrangler comes with 150 more to try, with everything from wacky out-there stuff to tried-and-true black and white film emulations.
I’m back with another Thomas Fransson film emulation for Canon cameras. This time, it’s time for a Fuji film simulation.
Thomas released Pro Neigh High, a Fuji-inspired picture profile pack for Canon. I loaded Pro Neigh Standard, one of the options, into my Canon 5D Mark II and took a few laps around the yard on a cold winter morning to test it out.
And? It’s fine. Lots of strength in the blues, but otherwise, nothing remarkable.
Street Photography Test
Then I took a warm morning and drove up to Leslie, Michigan, to test Pro Neigh Standard, one of the other options in Thomas’s film pack. There, I was truly in my favored conditions: high contrast, lots of light:
And again, nothing remarkable except those bright, saturated blues. Especially against bright buildings and white/beige, the blues truly pop with this film simulation.
Fuji film – actual film – tends to highlight the cooler colors like green and blue. But with this emulation, it’s mainly all about the blues. Every other color takes a backseat.
One additional test I could do is in the summertime, with foliage and greenery, like I did in my Kodak test last summer.
Testing Skin Tones
Another test includes some people photos to test skin tones. I brought along Pro Neigh High to church with us to grab some images of the kids, both inside and outside. Here is where Pro Neigh High does not shine:
Skin tones are, frankly, not great. Everything has this beige undertone, not at all natural or pleasing. In fact, the Pro Neg emulation takes away everything I love about Canon colors. Instead, most everything is flat and unappealing.
After these tests, this pack won’t be one of my three custom Canon picture profiles on any of my cameras. But that’s no shade on Thomas – he does great work, and maybe there are Fujifilm lovers out there who think this film emulation is just what they need, especially for vide work.
Grab the profile on Thomas’s Gumroad page and test it out yourself. He also gives a quick run-down on how to install these film simulations on your camera on his YouTube channel.
It’s funny to see the recent digicam craze. Everything old eventually becomes new again, and sure enough, it’s the classic point-and-shoot camera’s time to shine.
So, after a big snowstorm this weekend, I hiked into the Kate Palmer Wildlife Sanctuary here in Jackson, Michigan, to take my trusty Canon PowerShot SD750 on a photo walk in the woods. I also shared a few classic and recent shots with the PowerShot – a camera I used for years, on many trips, from 2007 up until I bought my Canon Rebel T1i in 2010.
Bringing it out into the woods reminded me of a few things:
The files hold up decently, but man, my modern photography eyes are spoiled. There’s so much chromatic aberration, shadow noise, and corner softness with this 35-110mm lens.
It is nice to have a tiny, pocketable camera that you can carry anywhere. I used it quite a bit over the holidays because of the flash and the size.
“Unfussiness” should be a guiding light in more modern cameras. The Ricoh GR series comes close to this level of simplicity. Truly: point and shoot.
I can see the charm. These younger generations want something imperfect. Film is difficult and expensive, so classic digital is the practical (and affordable) way to go.
This PowerShot will stay with me until it’s dead. It’s still fun to bring it out once in a while and remind myself that, for a long time, this was the best I had.
Ali from One Month Two Cameras discusses her needs and wants for her everyday carry camera—the one you use for just about everything.
For 12 years, that was the Canon M for me. Earlier this year, I upgraded to the Canon M200, but I’ve had second thoughts. And those thoughts came right as Ali’s video went live last week.
Fujifilm X cameras are known for their film simulations. Fuji owns and creates several film stocks, so it only makes sense that they build those film emulations into their family of cameras.
As a Kodak film user, however, there’s nothing like Fuji’s film emulations for other cameras – like my own, preferred Canon lineup.
That’s why it was great to learn that Canon’s own Picture Style options can be adapted to loosely match other film stocks out there. With that, I learned Thomas Fransson had created a series of Kodak film styles for Canon cameras. In this case, I downloaded Thomas’s Crowdak film simulation and applied it to a Canon M6 with an EF-M 28mm lense for a quick test.
Some initial thoughts:
With lots of greens and blues on my quick walk during my lunch hour, it was hard to see how the film simulation captured other colors and lighting conditions
Overall, very muted colors – more than I’m used to with my own style
Contrast was almost perfect for my style of shooting
It’s been a while since I purchased a new lens. The truth is, I really have all I need, even though the Canon R system keeps tempting me.
For my mirrorless system, I’m sticking with my trusty Canon M. Forever, I’ve had the EOS M 22mm attached to that camera. I see in cropped 35mm on that camera.
So when Canon had a fire sale on refurbished 32mm f/1.4 prime lenses for Black Friday, I thought, “Now’s the time to get something new.”
(My other plan is to upgrade the camera itself, since my faithful M is almost 10 years old now. But we’ll see what next year brings.)
The 32mm is a 51mm equivalent on the M system. My comfort zone is in that 35-50mm range, but the extra F stop adds the opportunity for some shallow depth of field on a near-portrait fixed lens. All these years, I’ve been limited to a 35mm view on the M. This new lens was my chance to put another option in a camera I use 75% of the time.
And what a lens. It took some time to get used to this new field of view, but after fiddling with the unique focus system, I got the hang of it. When we went Christmas tree shopping this weekend, I saw it as a perfect chance to take the lens for a spin on a chilly, sunny midwestern December day.
As with the other M lenses, the 32mm is tack sharp. It’s stunning what these little, lightweight lenses can do. It does stick out from the front of the camera more than the pancake-style 22mm does, so getting the grip and balance just right took some time. It was also weird not to look through a viewfinder and see that 50mm field of view – the M has a touchscreen and touch-focus system.
These are minor getting-adjusted points. It’s a great lens, and I can see building a truly lightweight, mirrorless system out of this, the 22mm, and maybe a wide-angle M lens paired with a new M camera.
Funny thing happened in that, I found myself inspired by the change of pace. The original 5D has such a beautiful sensor, it’s like changing film. While I miss flexibility in ISO and dynamic range the photos I get from the 5D are moody, colorful, contrasty, they really have a life of their own, in fact, as some of you already know, the camera defined my style 10+ years ago when I started to shoot with it.
Carey took a look back to when he first put down his 5D. His feeling then matches my own now: “This is a still photo camera. There is no shame in that.”
No shame, indeed. In fact, I see it as a point of pride. When you want to take pictures, you pick up a picture-taking machine.
You Don’t have to spend a fortune to get a great image. If your main hope is for fantastic image quality outdoors and if your willing to settle for lower dynamic range or high ISO performance there are a number of fantastic choices for photographers looking to start out in the world of full frame cameras.
A modern classic indeed. Everything old is new again.
Everyone talks about 50mm being the focal length for 35mm photography. And I mostly agree.
But lately, my 40mm pancake lens is getting a lot of use – for good reason.
Five millimeters north of a 35mm lens, and just a hair wider than 50mm, 40mm sits in a sweet spot. It’s wide enough to get landscapes and cityscapes, and yet short enough to do people well, and get details.
I took a chance on my own Canon EF 40mm f/2.8 STM pancake lens. Not that it’s not a good lens. It’s a great lens. And very affordable – especially when you buy it refurbished, like I did.
No, I took a chance because I thought, “I so love 50mm, why do I bother with 40mm?” It turns out that because of the lens’s size, weight, and utility, it’s now my most-used lens. It’s almost permanently strapped to my 5D. I just pick it up and go.
The 40mm doesn’t stick out from the camera, making it great for close-up shots of the kids at home, or of people out in the city. It’s a great front-seat lens that goes with me to and from work every day for the random landscape shot. It’s flexible for the kind of shooting I do, and I appreciate it more and more every day.
And now that I’ve had it for about a year, I’m getting to see the world in 40mm – just as I did with 50mm (both are natural, of course, being “normal” lenses). My Canonet probably helped warm me up to 40mm before that, as did my Fuji X-E1 with the 27mm (40mm equivalent) pancake lens.
While the 50mm gets all the creative credit in the photo world, it’s good to know there’s a handy, slightly-wider alternative in the 40mm lens.
After toying around with the mirrorless camera world, I got to appreciate the conveniences – what I call the throw-it-in-the-car effect. Mirrorless cameras like the Fuji X100 are light, small, and not prone to bang into things with a lens sticking out of the front.
Two years after purchase, I still love my Canon EOS M. I just had someone ask me about it on Flickr, and thought I’d share my review again.
It’s a great little camera as long as you accept its limitations.
I always love how the Phoblographer takes glamor shots of their cameras, usually with a rugged wooden table or canvas camera bag as the backdrop. So this weekend I took a leather jacket and tried to do the same with a bunch of my cameras, including this little Canon rangefinder.
Sure, the beer is great – a sour wheat beer that tickles my taste buds in all the right ways. But also, just look at that label. How can a photographer not enjoy the Instamatic and bright orange tones?
The top shot is from a 28mm lens – my favorite of the bunch. Next is a shot with an 85mm, and the final photo is with the 22mm EF-M. Not much difference in the 28mm and 22mm focal lengths, but look at that 85mm shot. The background just melts away. And the perspective totally flattens out.
But it doesn’t flatten out the taste (see what I did there?).
Beer + photography. Doesn’t get much better than that.